Getting ready
Contents
Getting ready
Installation
Install a current python distribution (64-bit, Python 3.8.x), e.g. Anaconda. The following steps were tested with Anaconda3 (v4.2.x, v4.3.1, v4.3.21, v5.1.0) - using a different Python distribution may require the installation of additional packages.
Important
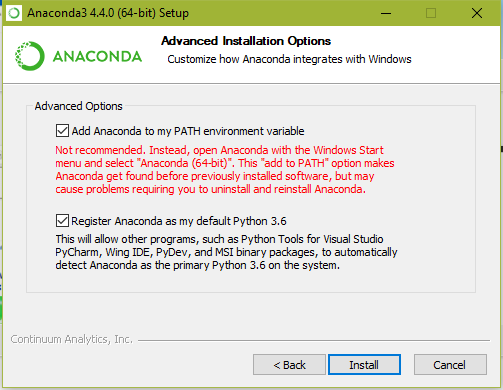
Unless you know what you are doing and are familiar with configuring different Anaconda workspaces, make sure that both boxes in the following dialog are checked:
You will need to start a windows shell which can be started using
cmd.exeorpowershell.exe. The latter is the better alternative, as it supports, among other things, a Unix-like syntax.The software needs several packages that may or may not be included the Anaconda distribution used. These include PyOpenGL, pyglet and MoviePy; furthermore, some example stimulus scripts may use seaborn. Therefore, execute in the shell:
pip install pyopengl
pip install pyglet==1.4.4
pip install moviepy
pip install seaborn
pip install pyqt5
Note
MoviePy is a which is a Python module for script-based movie editing, which is used by QDSpy to display videos.
When Python imports moviepy for the first time - and this will happen when QDSpy is started - moviepy checks if the software FFMPEG for video reading and writing is present on the machine. If not, it automatically downloads ffmpeg.win32.exe from https://github.com/imageio/imageio-binaries/tree/master/ffmpeg and stores it under
...\AppData\Local\imageio\ffmpeg.If you consider this behaviour irritating, please find instructions for manual installation on the Anaconda site.
If you know what you are doing, you can manually install the software using the following commands in a shell:
pip install imageioThen run
python, …… and
import imageio, and thenimageio.plugins.ffmpeg.download().
Copy the content of the .zip file into a folder (e.g.
C:\User\QDSpy), keeping the internal folder substructure intact.Warning
If you use GitHub desktop to update your installation from the repository, please make sure that you save copies of your stimulus files and the QDSpy configuration file
QDSpy.ini. To avoid overwriting existingQDSpy.ini, the repository does not contain one, however, the existing one might be deleted by the sync.To run QDSpy, it is important to add the path to the QDSpy main folder to the
PYTHONPATHenvironment variable. If this variable does not yet exist, it needs to be created. There are several ways to do this; an easy way is using Spyder, which comes with the Anaconda package:Run Spyder (note that the first start can take some time).
In the menu, select
Tools, thenPYTHONPATH managerAdd the path to the QDSpy folder and press the
synchronizebutton.
Note that open powershells need to be restarted to acknowledge this change.
If you do not use any special hardware (e.g. digital I/O, a lightcrafter etc) or do not need gamma correction, you can proceed to the section Running the GUI version of QDSpy. Otherwise continue with the following steps.
If you plan to use the LightCrafter 4500 not only as a displaying device but also want to configure it via QDSpy (via USB), then you will need the hidapi package.
For Python 3.4 through 3.7 (all 64 bit), pre-compiled libraries (
hid.cp3x-win_amd64.pyd) are provided in...\QDSpy\Devices. To test if it works, run python in the main directory and try to importhidfrom the...\QDSpy\Devicessubfolder:PS C:\User\QDSpy> python Python 3.5.1 |Anaconda 4.0.0 (64-bit)| (default, Feb 16 2016, 09:49:46) [MSC v.1900 64 bit (AMD64)] on win32 Type "help", "copyright", "credits" or "license" for more information. >>> import Devices.hid >>>
If no error occurs, your all set.
If this does not work, the
hidapipackage needs to be installed. The installation ofhidapivia pip generates an error unless the respective Microsoft Visual C++ compiler/SDK package is installed. Note that Python 3.4.x and 3.5.x require different versions of Microsoft Visual C++. Currently, the following steps seem to work for Python 3.5.x (and 3.6.x):Install Microsoft Visual Studio Community 2015 (or Microsoft Visual Studio Express 2015); the free version is sufficient. Make sure you choose the user-defined installation, where you can include Visual C++ including its tools as well as Python Tools for Visual Studio.
Goto hidapi, choose the newest package (currently
hidapi 0.7.99.post20) and follow the instructions listed under Build from source. To this end, use the git shell that comes with GitHub for Windows.
Now try again importing
hidas described above.
If you plan to use a digital I/O card from Measurement Computing, you need to install their Universal Library (the 64-bit version). Note that you’ll need to reboot before the library is available to QDSpy. Enable the support for digital I/O in the Configuration file:
[Timing]
bool_use_digitalio = True
str_digitalio_board_type = PCIDIO24
...
Measurement Computing’s Universal Library comes with an application called “InstaCal”, which provides you with the board and device number to be set here:
...
int_digitalio_board_num = 0
int_digitalio_device_num = 1
...
Adjust the following lines according to port (e.g. “A”) and pin (e.g. “2”) that gives out the stimulus marker. The input port definition is not yet used, however, it is recommended to use a different port (currently, QDSpy ignores the output pin and sets the complete output port according to the marker status!).
...
int_digitalio_port_out = A
int_digitalio_pin_markerOut = 2
int_digitalio_port_in = B
If you need gamma correction (currently Windows-only): Depending how strongly the color presentation needs to be changed, you may have to define/change a registry key that tells Windows normally to prevents too extreme color changes by the user. For details on gamma correction, see here.
To deactivate Windows’ safety measures, write the following text in a file with the extension
.regand double-click it:[HKEY_LOCAL_MACHINE\SOFTWARE\Microsoft\Windows NT\CurrentVersion\ICM] "GdiIcmGammaRange"=dword:00000100
To reactivate Windows’ safety measures:
[HKEY_LOCAL_MACHINE\SOFTWARE\Microsoft\Windows NT\CurrentVersion\ICM]
"GdiIcmGammaRange"=dword:00000000
You may have to reboot for this change to become active.
Note that QDSpy currently uses Windows’
SetDeviceGammaRampfunction to change gamma. The advantage is that it is very simple to use, however, a side effect is that all connected screens are affected.Warning
With the registry key set as described above, you can accidentally turn all screens unreadable!!
Running the GUI version of QDSpy
Open a windows shell (powershell.exe) and change to the QDSpy folder.
Run the GUI version of QDSpy:
Windows PowerShell
Copyright (C) 2014 Microsoft Corporation. Alle Rechte vorbehalten.

PS C:\Users\Thomas\QDSpy3> python QDSpy_GUI_main.py
Alternatively, use the included batch file QDSpy.bat to start the GUI
version of QDSpy. For instance, create a link to this batch file on the
desktop; change the icon of this linke to QDSpy.ico`.
Using the batch file is equivalent to
PS C:\Users\Thomas\QDSpy3> python QDSpy_GUI_main.py --gui
The optional command line parameter --gui directs all messages (except
for messages generated when scripts are compiled) exclusively to the history
window of the GUI. The parameter is ignored when starting stimulus files
directly from the shell.
Using QDSpy with the shell
Another way to compile and run stimulus scripts is by using the windows shell.
Start a shell and change to the folder that contains the stimulus scripts:
Windows PowerShell
Copyright (C) 2014 Microsoft Corporation. Alle Rechte vorbehalten.

PS C:\Users\Thomas> e:
PS E:\> cd .\user\Dropbox\QDSpy\QDS_stimuli
PS E:\user\Dropbox\QDSpy\QDS_stimuli>
Compile a script (for details on writing QDS stimulus scripts, see Writing QDSpy stimulus scripts):
PS E:\User\Dropbox\QDSpy\Stimuli> python .\stimLCTest2.py
     *** QDSpy v0.4 alpha Compiler - (c) 2013-15 Thomas Euler
         Initializing ...
         Defining objects ...
      ok 150 object(s) defined.
      ok 0 shader(s) defined.
         Generating scenes ...
      ok 245 scene(s) defined.
      ok Stimulus 'Test2' compiled for 60.0 Hz refresh (default).
      ok Stimulus 'Test2' saved to 'stimLCTest2.pickle'
      ok ... done in 1.204 s
PS E:\User\Dropbox\QDSpy\Stimuli>
Some information about the script is shown, the script is compiled and saved to disk as a .pickle file of the same name as the .py script file.
To present the compiled stimulus, run the script again:
PS E:\User\Dropbox\QDSpy\Stimuli> python .\stimLCTest2.py
     *** QDSpy v0.4 alpha Compiler - (c) 2013-15 Thomas Euler
         Initializing ...
    INFO Script has not changed, running stimulus now ...
     *** QDSpy v0.4 alpha Presenter - (c) 2013-15 Thomas Euler
      ok Initializing ...
         ENABLED    : high process priority during presentation
         enabled    : automatic garbage collection
    INFO OpenGL     : v4.3.12618 Compatibility Profile Context 13.251.9001.1001
    INFO Renderer   : AMD Radeon HD 7800 Series by ATI Technologies Inc.
    INFO Timing     : vsync-based (Pyglet calls), DEFAULT
      ok Window mode, 800x600 pixels
         ENABLED    : forced fsync
      ok SwapIntervalEXT() reported success
      ok Stage center: 0,0 pixels, scale: 0.83,0.83 µm/pix, rotation: 0°, refresh: 60.0 Hz
         2 shader type(s) found
      ok Stimulus 'stimLCTest2.pickle' loaded
         Name       : Test2
         Description: Test for Lightcrafter
         Frequency  : 60.0 Hz
      ok Stimulus 'Test2' prepared
      ok Running...
 WARNING dt of frame #2 was 13.824 ms
 WARNING dt of frame #60 was 33.576 ms
 WARNING dt of frame #120 was 19.380 ms
 WARNING dt of frame #121 was 14.338 ms
      ok Done
      ok Program finished
    INFO 16.666 ms/frame (60.002 Hz), rendering: 1.033 ms (720 frames in total)
    INFO 16.689 +/- 0.669 ms/frame (over the last 719 frames) = 59.9 Hz
 WARNING 4 frames dropped (=0.556 %)
      ok ... done
PS E:\User\Dropbox\QDSpy\Stimuli>
The script checks if the .pickle file is more recent that the .py file (indicating that the .py file has not changed). If this is the case, the stimulus is presented, acknowledging the settings in the folder’s configuration file (
QDSpy.ini, see Configuration file).Before displaying the stimulus, some information about the system is shown. To abort the stimulus, press
Q; note that (currently) the focus has to be on the stimulus window for these keys to be active.